Tuesday, January 25, 2011

Monkey fur Monday Jan. 24th


Spent five hours working on the rhesus monkey in maya. I've been having difficulty getting it into some sort t pose that doesn't look unnatural, but i think I'm finally close. We've been discussing how detailed the model needs to be for the distance it will be seen from so I put a quick texture map on my old model and it surprisingly looks decent. I think that I'm going to attempt to do some low poly video game style fur for it to break the smooth silhouette the monkey has right now. I watched several tutorials on digital tutors that were very helpful. Right now it looks like body armor but I'm working on transparency maps etc. so we'll see how that goes.


Sunday, January 23, 2011

Thingummy Bob 1-23


-5hrs
Went into ACCAD from 10-3. Worked on straightening out my documentation then onto the next phase of thingummybob after.

Ive been contemplating ways to incorporate more 'domestic' household items into the thingummybob. Today's experiment was a meat grinder. Although bringing back horrible memories of watching "The Wall" over and over again in highschool art class, I think it could work out pretty cool. It could give the actors another object to interact with as well. The "meat" cranked out of it could be pipes that grow and fade into the main box where they intertwine and create the machines underbelly. Just a thought.

I also reworked the 'lazy suzan' to better connect with the meat grinder. I've had to pay much more attention with this model to avoid messy geometry and overlapping in order to create a model that can be hopefully replicated by Matt when the time comes. We are still not sure if the wireless aspect will be stylized or if the actors will use one of the props, so i'm leaving it as is for now. Next step to finish sewing machine and figure out a way for it to attach to the grinder.

Friday, January 21, 2011

Monkey

Didn't make it to the production meeting today. I am going to Cleveland sat. so I needed the time today to work.

Spent 3.5 hours working on new monkey model. Just started placing in joints. Hopefully later this weekend I can upload a motion test video.

Thursday, January 20, 2011

Thursday Meeting with Actors 130-330pm


Worked for 2.5 hours on new Thingummybob model in maya. Met with Vita to discuss it before printing out a render and heading over to theater to meet with the actors. I flipped the sewing machine to the other side so the actors could use it properly. Also explored ideas for blurring the line between "top" and "bottom" of the thingummybob.


Spent 2 hours in class with the actors.


http://www.youtube.com/watch?v=WQfYUU4tvvE

We met with the actors today to discuss ideas for the Thingummybob scene and to watch the progress they have been making. The only object set in stone for the scene is the box center stage. Random props were used to take the place of the "objects to be built later" including a sewing machine, lazy susan, mechanical pump, wireless and a couple others. After watching the actors run throught the scene, it was decided that there needed to be six separate objects the actors would use to create the thingummybob. The wireless will most likely be already setup on the box from the scene prior and will also be the last object to be taken away. The first brought on will be sewing machine. Each women, while singing their parts will sit and work the sewin machine as the thingummybob comes together. I imagine as they use the sewing machine, it will produce a ribbon that crawls across the surface of the box as the thingummybob is created as well as being the driving force behind the entire machine i.e. as the needle raises up and down the pump begins to work, pipes begin to form, gears begin to turn etc. Near the end of the song, the music stops and the men (soldiers) march across the scene from backstage, and take four items, one for each soldier, that the women had just created. The projection of the thingummy bob will wipe clean as the first soldier passes infront. At the end, the women are singing acapella and only the sewing maching and wireless are left. Finally, an actress takes away the sewing machine leaving a single actress to work at the wireless.

The actors expressed interest in making each of the four objects (besides the wireless and sewing machine) to represent some other aspect of domestic life. I'm not sure at this point what they could be. Maybe a meat grinder or some other mechanical type kitchen utensil or more gadgets pertaining to the production of textiles and clothing.

Tuesday, January 18, 2011

Meeting Jan 18th

Met with Nikki, Tom and Vita for about an hour. Mostly just an overview of where we are at and what we are to do next. I'm going to keep working on the thingummybob and also getting the rhesus monkey finished up by the end of the month.

Monday, January 17, 2011

Monkey Reworked

3.5 hours cleaning geometry/rigging and re-weighting

I thought I would take a break from the thingummybob until our meeting on Tuesday. I revisited the rhesus monkey model I made awhile ago. Ibson is coming to EMMA on the 28th to mocap for the monkey's movement, so it would be a good idea to get the model and rig closer to finished. I was happy with the model overall the first time around, but I made the mistake of modeling it in a pose not suitable for rigging and weighting (its on all fours, far from any kind of T pose). Before creating a whole new model, I spent a few hours adjusting geometry, mostly shapes and size of legs, in an attempt to make a more rig friendly model. It seemed no matte how much I cheated the model, I couldn't find a setup that allowed any kind of natural movement.

Friday, January 14, 2011

Thingummy Bob


Based on my final sketch and from meeting with vita, I came up with the following model. Our biggest research question/ interest is projecting onto organic/blob-ular surfaces so I tried to model the top half as one solid flowing piece while keeping shapes distinct enough to separate them visually. The far left model is the wireless. It's shape is based on the relief/perspective sculpture reference we looked at last week.


This render was to show ways the same model above, could be disassembled and moved around. It was roughly done and perhaps in to many pieces but serves more to get the basic idea of how these smaller objects can come together on the central box to from the thingummybob.


Vita suggested it would be a good idea to draw directly on top of one of the renders to represent 'projected' images. It worked out pretty well. Top from right to left: Sewing machine plugs into pipes/steampunk styled clock which connects to lazy suzan and then wireless. Middle: a conveyor belt formed from discharged bullet shells (from sewing machine) which flow right to left. Bottom right to left: Pump pulsing up and down with sewing machine. Guts/pipes of the machine projected. Furnace that powers the machine/reference to crematorium. Steam stacks and barrel that is catching the bullets as they fall from above.

Thursday, January 13, 2011

Thingummy Bob Sketches


I was trying to combine gears with a sort of 'domestic' living room table or something. Dropped it pretty early.


Here I was exploring forced perspective and trying to find a form that could represent a sewing machine.

Did some sketches on how the thingummy bob should look. It's surprisingly difficult to start designing something so obscure. I knew I wanted to include some surrealist ideas and M.C. Escher-esk designs (maybe in the pipes) and that the "thing" would be driven by a sewing machine. Other than that I just started drawing shapes and forms based on surrealist sculpture and tried to explore how the final product could be broken down and pieced back together.

Tuesday, January 11, 2011

Meeting Jan. 11th


Went over thing-umma-bob sketches and 3d models from the week before. We sat down as a group (Vita, Nikki, Tom and I) and started sketching out ideas on the white board. It was nice to bounce idea's back and forth and we came up with some pretty good ideas to go off of. The final machine will most likely be powered by the sewing machine, which will drive the motion somewhat like the game mouse trap. Gears, pipes, steam, conveyor etc. will all make up the "thing". We also discussed Nikki's Noor poem story ideas and general aspects of stage and projector layout.


Sunday, January 9, 2011

Wrapping up projection excersice

There were many things to learn from this projection exercise. First off, Ben's camera/projector system for calculating object and camera positions in physical and digital space worked excellent. Secondly, Nikki and I were reminded of the importance of checking and double checking projector settings. When we began working on the 2d portion, we neglected to check our keystone values on the Optoma. We would have noticed earlier if we were projecting in 3d when our camera's didn't align, but since we were drawing live in photoshop we unknowingly adjusted for the keystoned projection. When I got to projecting 3D, we noticed the problem so it was necessary to move the duck and sphere to match the projection, so we decided to first wrap up 2D before moving on so that we wouldn't have to move objects back and forth.

The first thing I did before beginning building objects in maya was figuring out the their physical dimensions. It was an easy process. The duck was built from a previous 3D model I have made so it was just a matter of scaling the model to match. The sphere we wrapped with a string to find its circumference and did the easy math. Since the objects are organic, there was no easy way to measure their position in physical compared to its surroundings, (back wall). If it were a cube we could just measure from a corner and match it exactly in maya. I ended up attempting to find a center point on both the sphere and the duck and making an estimate of there positions. With Bens new system of calculating camera positions/settings, I knew that our 3D camera was correct so it was just a matter of projecting the 3D image and nudging the physical objects into place. Once everything aligned I could place tape on the table to help realign the objects if we had to move them.

After everything was aligned it was just a matter of creating the animations in maya to explore lighting and geometry deformation. I stared with lighting. I created a mallard texture to project onto the duck and a basketball for the sphere. I created a light pointing at the objects from the right rear. I animated it to move clockwise around the objects so that we could see how the shadows looked in the physical space. The shadows translated well and without deformations that relied on perspective, it was viewable from a wide range of angles.

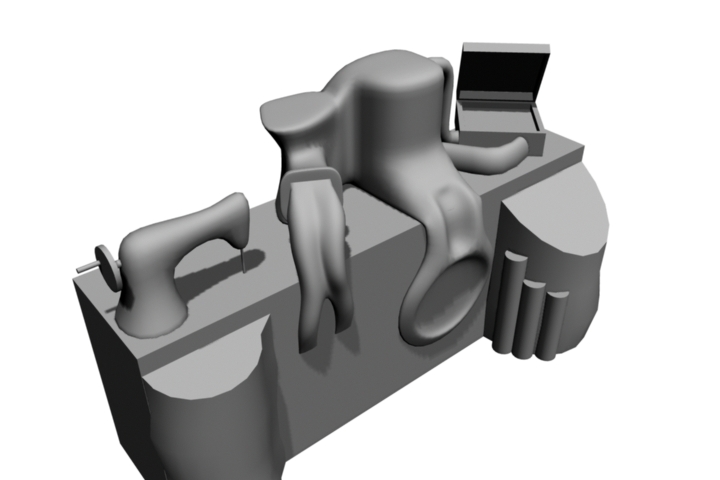
For the next part of the exercise I extruded a series of squares from both the duck and sphere. Initially I animated random squares extending to random distances. It seemed like a good idea, but when watching the animation play as projection it became distracting and too difficult to analyze. So I reworked the maya file and made everything much more uniform. The squares were all extruded 'every other' and I made sure to extrude them together. I also slowed the animation down so we could see how the extrusions worked at many distance. I began with pulling them inwards and then slowly extruding them outwards. As expected, the shorter the distance, whether pulling in or pushing out, the wider viewing angle to view to illusion properly. As the squares traveled further outward towards the viewer, the illusion of depth was lost unless you stood very close to the projection source. The "intrusion" of squares were much more effective from a range of viewing angles when pulled in to greater depths.

We also learned a very valuable lesson about projection surfaces. The sphere was made of foam, and something about it's pouruss and reflective material dulled all of the projections. Also, purely white materials tend to over saturate the projections as well so you have to either a.) adjust the animations color balance or b.) paint the physical objects a slightly darker shade of gray. White semi-glossy posterboard was used for the floor and back walls. The surfaces caused a lot of light bounce which washed out the lower parts of the projections even when projecting black.


Taken from extreme left of projection source.


Same as above but with more extreme extrusion. Notice how quickly the illusion is lost.


Close up and to the left....


Table height and extreme right.


Straight on and short deformation


Straight on with lengthier deformation. Most of the illusion stays intact from this view.


Saturday, January 8, 2011

Thing Ummy Bob brainstorm session 1-6-11

Today I met Vita and Nikki over at the drake to work with the actors in Thing Ummy Bob development. (about 2 hours) We listened to the song a couple times then had a brainstorm session with possible performance ideas and object designs. It was interesting to here what the actors bounce ideas off each other in such quick succession. Some of the major points taken away from the session were:

-Contrasting beautiful women with work environment
-"cute song" contrasted with dirty/gritty labor
-Slow build of structure-one object at a time changing projections with each addition
-The idea of not knowing what your making but being enthusiastic about it "we're going to win the war!"
-Music created by motion
-Possibly building the thing ummy bob out of objects women are "supposed" to be familiar with (ex. sewing machines)
-Possibly ending with a surreal steam punk type mechanical object.

Time to start sketching.

Tuesday, January 4, 2011

Meeting Jan. 4th

Met with Vita, Nikki and Tom today for about 2 hours. Discussed updates on script developement from theater folks. It's been decided that there is going to be a musical number in the show. The actors will be performing the Arthur Askey version of Thing-ummy-bob (Thats gonna win the war). Its a song about women in the war and their role of manufacturing the thing that will win the war. The song is completely un-specific and gives me us a chance as designers/artists to design the object from the ground up. It is my next assignment to start sketching out possible designs.